\(\renewcommand{\AA}{\text{Å}}\)
8.6.3. Using the LAMMPS GUI
This document describes LAMMPS GUI version 1.4.
Pre-compiled, ready-to-use LAMMPS GUI executables for Linux (Ubuntu
20.04LTS and compatible or later), macOS (version 11 or later), and
Windows (version 10 or later) are available.
The source code of the LAMMPS GUI is included in the
tools/lammps-gui folder of the LAMMPS distribution and it can be
compiled alongside LAMMPS.
LAMMPS GUI is a simple graphical text editor that is linked to the LAMMPS C-library interface and thus can run LAMMPS directly using the contents of the editor’s text buffer as input and can retrieve and display information from LAMMPS while it is running.
This is similar to what people traditionally would do to run LAMMPS using a command line window: using a regular text editor to edit the input, run LAMMPS on the input with selected command line flags, and then extract data from the created files and view them. That procedure is quite effective and often required when running LAMMPS on high-performance computing facilities, or for people proficient in using the command line, as that would allow them to select tools for the individual steps they are more comfortable with. The main benefit of a GUI application is that it integrates well with graphical desktop environments and many basic tasks can be done directly from the GUI without switching to a text console or requiring external programs, let alone scripts to extract data from the generated output. This makes it easier for beginners to get started running simple LAMMPS simulations and thus very suitable for tutorials on LAMMPS. But also keeps the barrier low to switch to a full featured programming editor and more sophisticated visualization and analysis tools later.
The following text provides a detailed tour of the features and functionality of the LAMMPS GUI.
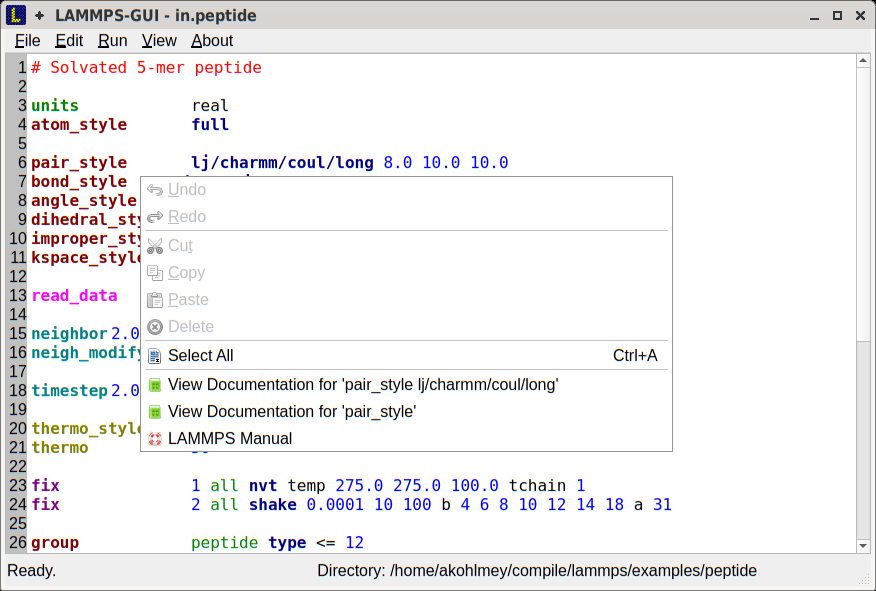
Main window
When LAMMPS GUI starts, it will show the main window with either an empty buffer, or the contents of a file loaded. In the latter case it may look like the following:
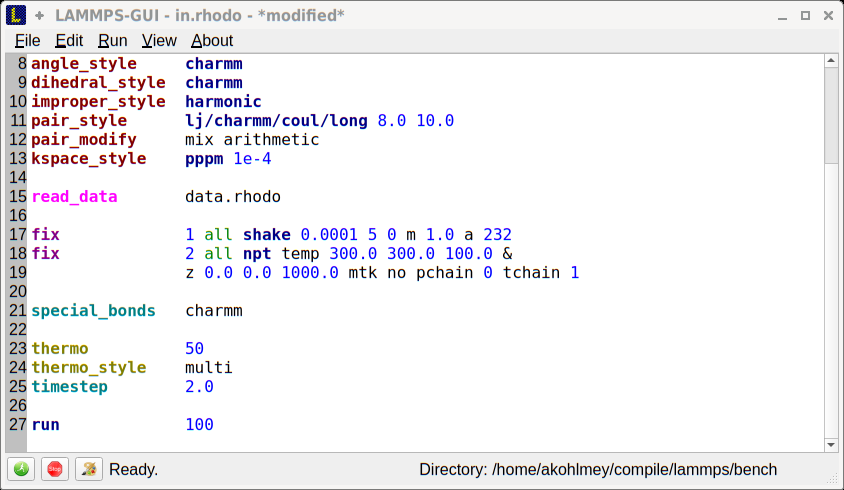
There is the menu bar at the top, then the main editor buffer with the input file contents in the center with line numbers on the left and the input colored according to the LAMMPS input file syntax. At the bottom is the status bar, which shows the status of LAMMPS execution on the left (“Ready.” when idle) and the current working directory on the right. The size of the main window will be stored when exiting and restored when starting again. The name of the current file in the buffer is shown in the window title and the text *modified* is added in case the buffer has modifications that are not yet saved to a file.
Opening Files
The LAMMPS GUI application will try to open the first command line
argument as input file, further arguments are ignored. When no argument
is given, LAMMPS GUI will start with an empty buffer. Files can also be
opened via the File menu or by drag-and-drop of a file from a file
manager to the editor window. Only one file can be open at a time, so
opening a new file with a filled buffer will close this buffer and - in
case the buffer has unsaved modifications - will ask to either cancel
the load, discard the changes, or save them to the file.
Running LAMMPS
From within the LAMMPS GUI main window LAMMPS can be started either from
the Run menu using the Run LAMMPS from Editor Buffer entry, by
the hotkey Ctrl-Enter (Command-Enter on macOS), or by clicking on
the green button in the status bar.
LAMMPS runs in a separate thread, so the GUI stays responsive and thus
it is able to interact with the running calculation and access its data.
It is important to note, that running LAMMPS this way is using the
contents of the input buffer for the run (via the
lammps_commands_string() function of the LAMMPS C-library
interface), and not the file it was read from. Thus, if there are
unsaved changes in the buffer, they will be used. As an alternative,
it is possible to start LAMMPS with the contents of the file from the
Run LAMMPS from File menu entry or with Ctrl-Shift-Enter. This
option is intended as a fallback option, in case the input uses some
functionality that is not compatible with running LAMMPS from a list of
strings. For consistency, any unsaved changes in the buffer must be
either saved to the file or undone before LAMMPS can be run from a file.

While LAMMPS is running, the contents of the status bar change: on the
left side there is a text indicating that LAMMPS is running, which will
contain the selected number of threads, if thread-parallel acceleration
was selected in the Preferences dialog. On the right side, a
progress bar is shown that displays the estimated progress on the
current run command.
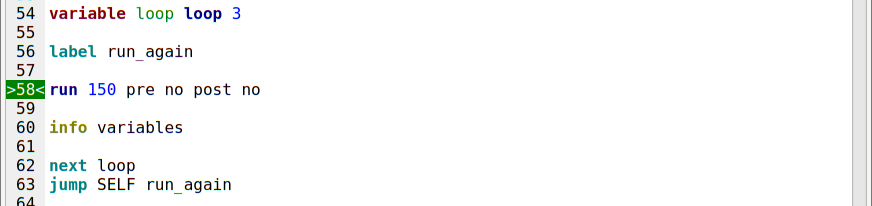
Also, line number of the currently executed command will be highlighted in green.
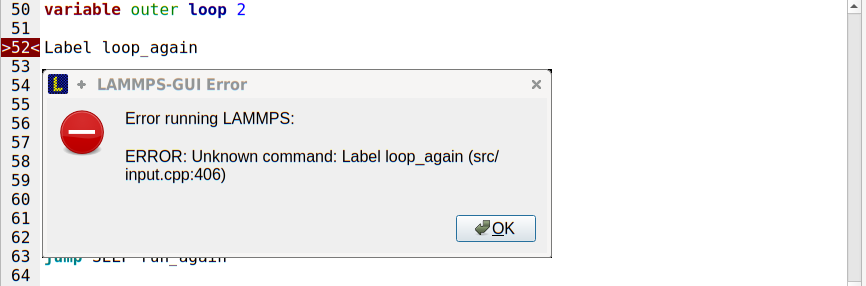
In case of an error (in the example below the command label was incorrectly capitalized as ‘Label’), and error message dialog will be shown and the line of the input where the error was triggered will be highlighted. And the state of LAMMPS as shown in the status bar will be “Failed.” instead of “Ready.”
Additionally, two windows will open: the log window with the captured screen output and the chart window with a line graph created from the thermodynamic output of the run. More information on those is below.
The run can be stopped cleanly by using either the Stop LAMMPS entry
in the Run menu, the hotkey Ctrl-/ (Command-/ on macOS), or
clicking on the red button in the status bar. This will cause that the
running LAMMPS process will complete the current iteration and then
stop. This is equivalent to the command timer timeout 0
and implemented by calling the lammps_force_timeout()
function of the LAMMPS C-library interface.
Log Window
By default, when starting a run, a “Log Window” will open that displays the current output of the LAMMPS calculation as shown below.
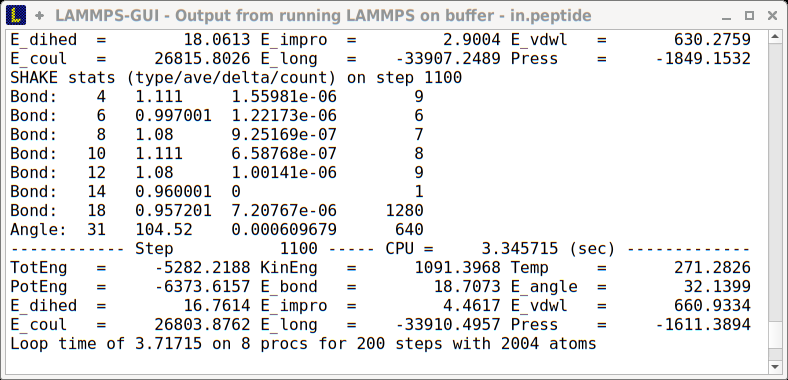
This shows the output that would normally be printed to the screen when running the LAMMPS command in a command line window. LAMMPS GUI captures it and will update the window regularly during a run with the output as it is generated.
By default, there will be a new window for each run, so that it is possible to
compare outputs from different runs with, for example, changes to some settings.
But it is also possible to change the behavior of LAMMPS GUI to replace an
existing log window for a new run or to not show the window by default. It
is possible to show or hide this window from the View menu.
The text in the log window is read-only and cannot be modified, but editor commands to select and copy all or parts of the text can be used. The “Select All” and “Copy” functions are also available via a context menu by clicking with the right mouse button.
Chart Window
By default, when starting a run, a “Chart Window” will open that displays charts of the thermodynamic output of the LAMMPS calculation as shown below.
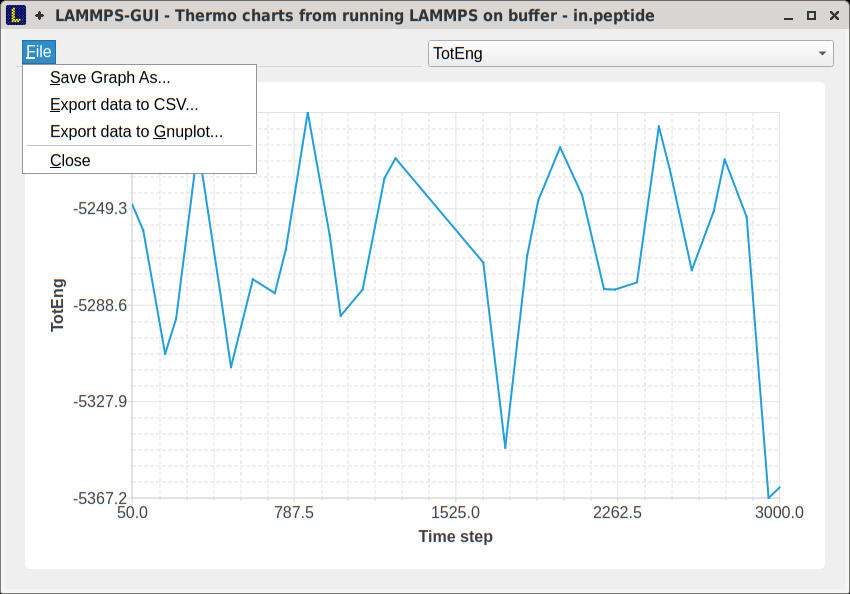
These charts will be updated with new data as the run progresses, so
they can be used to visually monitor the evolution of the available
properties. The drop down menu on the top right allows to select
between the different properties that are written to the output. Only
one property can be shown at a time. From the File menu on the top
left, it is possible to save an image of the currently displayed chart
or export the data in either plain text columns (as usable for plotting
tools like gnuplot or grace), or as CSV data which can
be imported for further processing with Microsoft Excel or pandas
Data from multiple run commands will be combined into a single data set unless the format, number, or names of output columns are changed or the current time step is reset with reset_timestep or a clear command is issued.
Image Slide Show
By default, in case the LAMMPS input contains a dump image command, a “Slide Show” window will open which loads and displays the images created by LAMMPS as they are written.
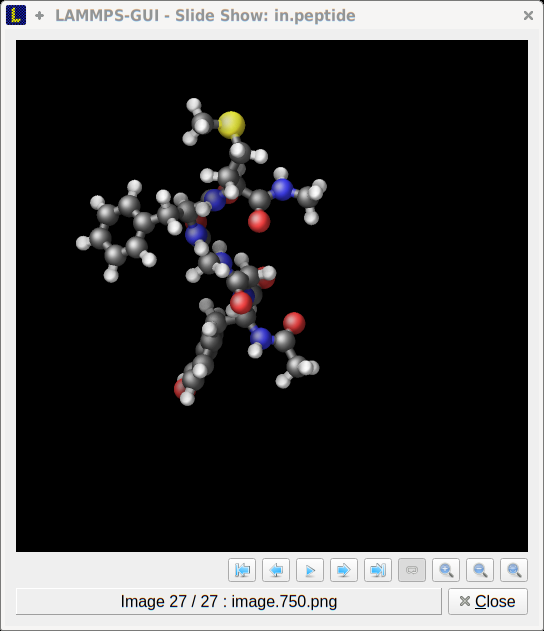
The various buttons at the bottom right of the window allow to either single step through the list of images or play an animation (as a continuous loop or once from first to last). It is also possible to zoom in or zoom out.
Variable Info
During a run, it may be of interest to monitor the value of variables,
for example to monitor the progress of loops. This can be done via
enabling the “Variables Window” in the View menu or by using the
Ctrl-Shift-W hotkey. This will show info similar to the info
variables command in a separate window as shown below.

Like the log and chart windows, its content is continuously updated
during a run, and will show “(none)” if there are no variables defined.
Please note that it is also possible to set index style
variables, that would normally be set via command line flags,
via the “Set Variables…” dialog from the Run menu.
Viewing Snapshot Images
By selecting the Create Image entry in the Run menu, by hitting
the Ctrl-I (Command-I on macOS) hotkey, or by clicking on the
“palette” button in the status bar, LAMMPS GUI will issue a
write_dump image command and read the resulting
snapshot image into an image viewer window. When possible, LAMMPS GUI
will try to detect which elements the atoms correspond to (via their
mass) and then colorize them accordingly. Otherwise some predefined
sequence of colors is assigned to the different atom types.
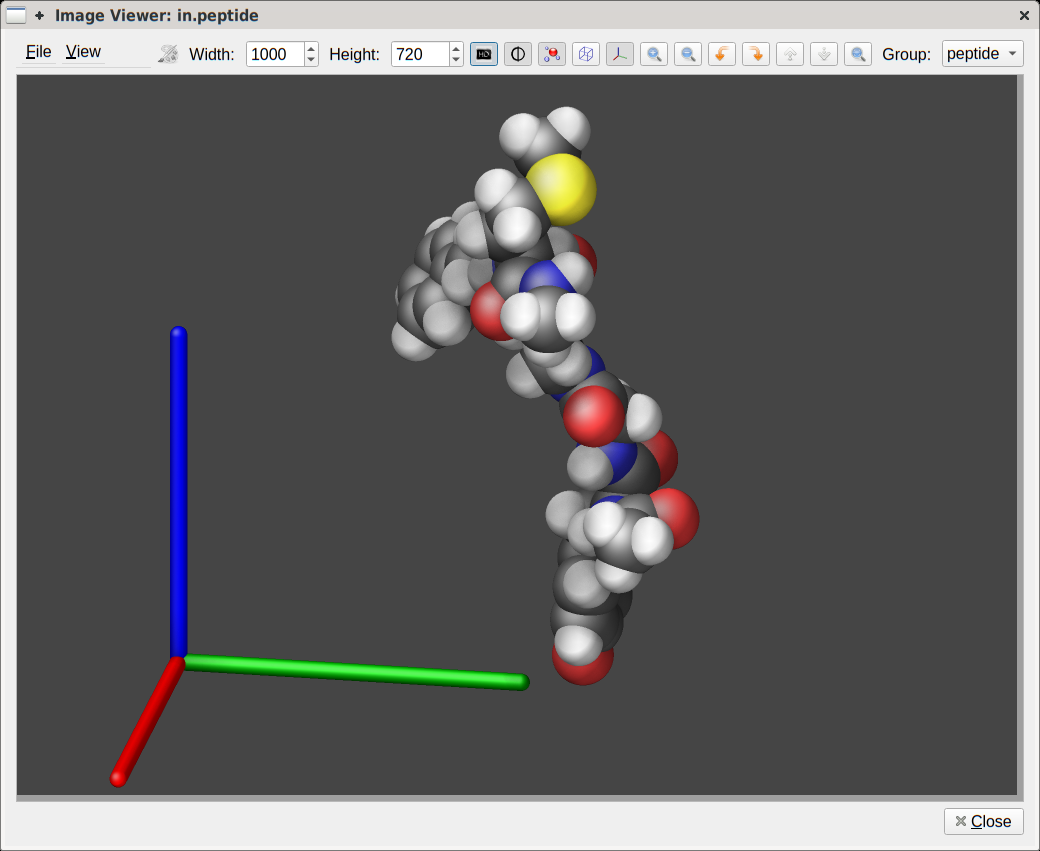
The default image size, some default image quality settings, the view
style and some colors can be changed in the Preferences dialog
window. From the image viewer window further adjustments can be made:
actual image size, high-quality rendering, anti-aliasing, view style,
display of box or axes, zoom factor. The the image can be rotated
horizontally and vertically and it is possible to only display the atoms
within a predefined group (default is “all”). After each change, the
image is rendered again and the display updated. The small palette icon
on the top left will be colored while LAMMPS is running to render the
new image and it will be grayed out again, when it is done. When there
are many items to show and high quality images with anti-aliasing are
requested, re-rendering can take several seconds. From the File
menu, the shown image can be saved to a file permanently or copied into
the cut-n-paste buffer for pasting into another application.
Editor Functions
The editor has most the usual functionality that similar programs have: text selection via mouse or with cursor moves while holding the Shift key, Cut (Ctrl-X), Copy (Ctrl-C), Paste (Ctrl-V), Undo (Ctrl-Z), Redo (Ctrl-Shift-Z), Select All (Ctrl-A). All of these editing functions are available via the indicated hotkeys. When trying to exit the editor with a modified buffer, a dialog will pop up asking whether to cancel the quit, or don’t save or save the buffer’s contents to a file.
Context Specific Help
A unique feature of the LAMMPS GUI is the option to look up the documentation for the command in the current line. This can be achieved by either clicking the right mouse button or by using the Ctrl-? hotkey. When clicking the mouse there are additional entries in the context menu that will open the corresponding documentation page in the online LAMMPS documentation. When using the hotkey, the first of those entries will be chosen directly.
Menu
The menu bar the entries File, Edit, Run, View, and About.
Instead of using the mouse to click on them, the individual menus can also
be activated by hitting the Alt key together with the corresponding underlined
letter, that is Alt-f will activate the File menu. For the corresponding
activated sub-menus, also the underlined letter, together with the Alt key can
be used to select instead of the mouse.
File
The File menu offers the usual options:
Newwill clear the current buffer and reset the file name to*unknown*Openwill open a dialog to select a new fileSavewill save the current file; if the file name is*unknown*a dialog will open to select a new file nameSave Aswill open a dialog to select and new file name and save the buffer to itQuitwill exit LAMMPS GUI. If there are unsaved changes, a dialog will appear to either cancel the quit, to save, or to not save the edited file.
In addition, up to 5 recent file names will be listed after the Open
entry that allows to re-open recent files. This list is stored when
quitting and recovered when starting again.
Edit
The Edit menu offers the usual editor functions like Undo,
Redo, Cut, Copy, Paste, but also offers to open the
Preferences dialog (hotkey Ctrl-P) and to delete all stored
preferences so they will be reset to their default values.
Run
The Run menu allows to start and stop a LAMMPS process. Rather than
calling the LAMMPS executable as a separate executable, the LAMMPS GUI
is linked to the LAMMPS library and thus can run LAMMPS internally
through the LAMMPS C-library interface.
Specifically, a LAMMPS instance will be created by calling
lammps_open_no_mpi() and then the buffer contents are run by
calling lammps_commands_string(). Certain commands and
features are only available, after a LAMMPS instance is created. Its
presence is indicated by a small LAMMPS L logo in the status bar at
the bottom left of the main window. As an alternative, it is also
possible to run LAMMPS using the contents of the edited file by reading
the file. This is mainly provided as a fallback option in case the
input uses some feature that is not available when running from a string
buffer.
The LAMMPS calculation will be run in a concurrent thread so that the
GUI will stay responsive and will be updated during the run. This can
be used to tell the running LAMMPS instance to stop at the next
timestep. The Stop LAMMPS entry will do this by calling
lammps_force_timeout(), which is equivalent to a timer
timeout 0 command.
The Set Variables... entry will open a dialog box where index
style variables can be set. Those variables will be passed
to the LAMMPS instance when it is created and are thus set before a
run is started.

The Set Variables dialog will be pre-populated with entries that are
set as index variables in the input and any variables that are used but
not defined as far as the built-in parser can detect them. New rows for
additional variables can be added through the Add Row button and
existing rows may be deleted by clicking on the X icons on the right.
The Create Image entry will send a dump image
command to the LAMMPS instance, read the resulting file, and show it in
an Image Viewer window.
The View in OVITO entry will launch OVITO
with a data file of the current state of the system.
This option is only available, if the LAMMPS GUI can find the OVITO
executable in the system path.
The View in VMD entry will instead launch VMD, also to load a
data file of the current state of the system. This
option is only available, if the LAMMPS GUI can find the VMD executable
in the system path.
View
The View menu offers to show or hide the additional windows with
log output, charts, variables, images. The default settings for those
can be changed in the Preferences dialog.
About
The About menu finally offers a couple of dialog windows and an
option to launch the LAMMPS online documentation in a web browser. The
About LAMMPS GUI entry displays a dialog with a summary of the
configuration settings of the LAMMPS library in use and the version
number of LAMMPS GUI itself. The Quick Help displays a dialog with
a minimal description of LAMMPS GUI. And LAMMPS Manual will open
the main page of this LAMMPS documentation at https://docs.lammps.org/.
Preferences
The Preferences dialog allows to customize some of the behavior
and looks of the LAMMPS GUI application. The settings are grouped
and each group is displayed within a tab.
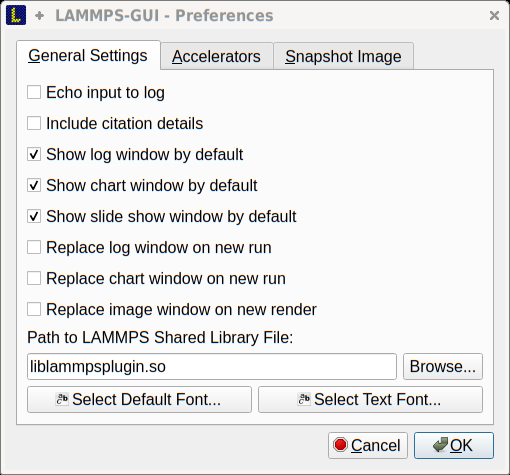

General Settings:
Echo input to log: when checked, all input commands, including variable expansions, will be echoed to the log window. This is equivalent to using -echo screen at the command line. There is no log file produced by default, since LAMMPS GUI uses -log none.
Include citation details: when checked full citation info will be included to the log window. This is equivalent to using -cite screen on the command line.
Show log window by default: when checked, the screen output of a LAMMPS run will be collected in a log window during the run
Show chart window by default: when checked, the thermodynamic output of a LAMMPS run will be collected and displayed in a chart window as line graphs.
Show slide show window by default: when checked, a slide show window will be shown with images from a dump image command, if present, in the LAMMPS input.
Replace log window on new run: when checked, an existing log window will be replaced on a new LAMMPS run, otherwise each run will create a new log window.
Replace chart window on new run: when checked, an existing chart window will be replaced on a new LAMMPS run, otherwise each run will create a new chart window.
Replace image window on new render: when checked, an existing chart window will be replaced when a new snapshot image is requested, otherwise each command will create a new image window.
Path to LAMMPS Shared Library File: this options is only available when LAMMPS GUI was compiled to load the LAMMPS library at run time instead of being linked to it directly. With the
Browse..button or by changing the text, a different shared library file with a different compilation of LAMMPS with different settings or from a different version can be loaded. After this setting was changed, LAMMPS GUI needs to be re-launched.Select Default Font: Opens a font selection dialog where the type and size for the default font (used for everything but the editor and log) of the application can be set.
Select Text Font: Opens a font selection dialog where the type and size for the text editor and log font of the application can be set.
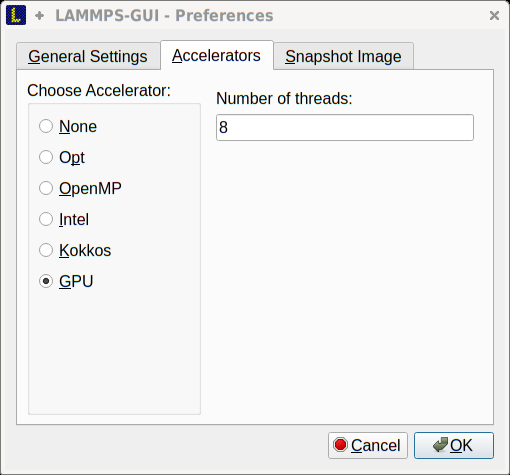
Accelerators:
This tab enables to select which accelerator package is used and is equivalent to using the -suffix and -package flags on the command line. Only settings supported by the LAMMPS library and local hardware are available. The Number of threads field allows to set the maximum number of threads for the accelerator packages that use threads.
Snapshot Image:
This tab allows to set some defaults for the snapshot images displayed
in the Image Viewer window, like its dimensions and the zoom factor
applied. The Antialias switch requests to render images with twice
the number of pixels for width and height and then smoothly scales the
image back to the requested size. This produces higher quality images
with smoother edges at the expense of requiring more CPU time to render
the image. The HQ Image mode option turns on using a screen space
ambient occlusion mode (SSAO) when rendering images. This is also more
time consuming, but produces a more ‘spatial’ representation of the
system. The VDW Style checkbox selects whether atoms are represented
by space filling spheres when checked or by smaller spheres and stick.
Finally there are a couple of drop down lists to select the background
and box color.
Hotkeys
Almost all functionality is accessible from the menu or via hotkeys. The following hotkeys are available (On macOS use the Command key instead of Ctrl/Control).
Hotkey |
Function |
Hotkey |
Function |
Hotkey |
Function |
|---|---|---|---|---|---|
Ctrl+N |
New File |
Ctrl+Z |
Undo edit |
Ctrl+Enter |
Run LAMMPS |
Ctrl+O |
Open File |
Ctrl+Shift+Z |
Redo edit |
Ctrl+/ |
Stop Active Run |
CTRL+S |
Save File |
Ctrl+C |
Copy text |
Ctrl+Shift+V |
Set Variables |
Ctrl+Shift+S |
Save File As |
Ctrl+X |
Cut text |
Ctrl+I |
Snapshot Image |
Ctrl+Q |
Quit |
Ctrl+V |
Paste text |
Ctrl-L |
Slide Show |
Ctrl-W |
Close Window |
Ctrl-A |
Select All |
Ctrl+P |
Preferences |
Ctrl+Shift+A |
About LAMMPS |
Ctrl+Shift+H |
Quick Help |
Ctrl+Shift+G |
LAMMPS GUI Howto |
Ctrl+Shift+M |
LAMMPS Manual |
Ctrl+? |
Context Help |
Ctrl-Shift-W |
Show Variables |
Further editing keybindings are documented with the Qt documentation. In case of conflicts the list above takes precedence.